Skip to Content

Digital Accessibility

Header Rows in the CMS

You will need to add clear, accurate column headings in a header row to comply with digital accessibility guidelines. This ensures all users are able to understand and navigate the data.

Adding a Header Row

In just a few simple steps, you can add a new header row if you deleted the one provided by default with the CMS table snippets or if you are building a table that requires merged cells and need to add a header row manually. 

1. Add your header row text.

Your header row is the first row of your table. In this row, you should write column headers that accurately describe the information found in each column. If needed, add a new top row to be your header row.

  1. Right-click within your top row to access the Table menu. 
  2. If you need a new top row, hover over Row, then select Insert Row Before. 
  3. Add a column heading to the top cell of each column in this first row.

    Screenshot of the OU Campus editor toolbar showing the Table menu icon highlighted in a garnet rectangle next to the Expand Content icon. The Table menu shows options for Insert Table, Table Properties, Delete Table, and Show Table Outlines, then options for Cell, Row, and Column. Row is selected with a dark blue background, with a submenu showing Insert Row highlighted in a garnet rectangle followed by Insert Row After.

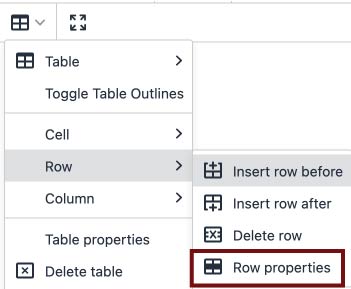
2. Update the table row properties.

  1. Right-click within your top row to access the Table menu.
  2. Hover over Row, then select Row Properties.
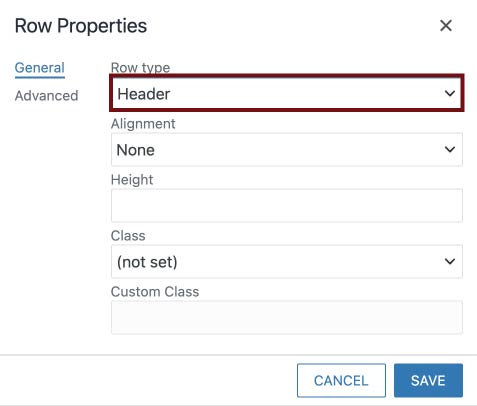
  3. Change the Row Type to Header
  4. Click "Save"

       Screenshot of the OU Campus editor toolbar with the table options dropdown active, next to the Expand Content icon. The table menu shows options for Cell, Row, and Column. Row is selected with a grey background, and a submenu shows options for Insert Row Before, Insert Row After, Delete Row, and Row Properties, which is highlighted in a garnet rectangle. The dropdown also shows options for Table and Toggle Table Outlines above and Table properties and Delete Table at bottom.

    Screenshot of the Row Properties dialogue box with tabs for General and Advanced options at the top and Cancel or Save at the bottom. On the General tab, the Row type dropdown is set to Header and highlighted with a garnet rectangle, with empty fields for Alignment (None), Height, Class (not set) and Custom Class.  

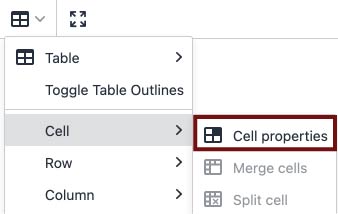
3. Update the cell properties.

  1. Select all header cells by highlighting the top row.
  2. Right-click within your top row to access the Table menu.
  3. Hover over Cell, then select Cell Properties
  4. Change the Cell Type to Header Cell.
  5. Click "Save"

    Screenshot of the OU Campus editor toolbar with the table dropdown icon highlighted in a garnet rectangle, next to the Expand Content icon. The table menu shows options for Table and Toggle Table Outlines, followed by Cell, Row, and Column. Cell is selected with a grey background, and a submenu shows Cell Properties highlighted with a garnet rectangle, followed by greyed out options for Merge Cells or Split Cell.

    Screenshot of the Cell Properties dialogue box with tabs for General and Advanced options at the top and Cancel or Save at the bottom. On the General tab, Width and Height have empty text fields; the Cell type dropdown is set to Header cell and highlighted with a garnet rectangle; Scope, H Align and V Align are set to None; and Class shows (not set); Custom Class is empty.

Video Tutorial

Learn how to add a header row.


Rebuilding a Table in a New Snippet

If you manually built your table using the Table icon in the toolbar but do not need to use merged cells, you should rebuild your content using a CMS table snippet. Manually built tables do not automatically provide the required header row and may cause accessibility issues for your site.


Challenge the conventional. Create the exceptional. No Limits.

©