How to Add Headings in Word
Organize your content using proper heading order that contains only one Heading Level 1. Your Heading 1 should capture the main idea of the document, with each nested heading containing related information. There are no limits to the number of other heading levels, but you should not skip heading levels.
You can add headings to your document within Word’s Home tab options:
- Start a new line of content or highlight existing text to set as a heading.
- Open the Home tab and choose appropriate Heading from the Styles options.

Windows version of Word Heading Styles. 
Mac version of Word Heading Styles. - Do not use the Heading Styles to create white space in your document.
Empty headings create a gap in your document structure to screen reader users. If you need to add extra white space, you can increase your line spacing or paragraph spacing.
Windows keyboard shortcut tip: Ctrl + Alt + 1, 2, or 3 can assign Headings 1, 2, or 3 to content, respectively.
Heading Tips Beyond Accessibility
Headings not only improve the experience for readers, but also for document creators:
- Structured headings increase design change efficiency. Say you want to change the styles for all of your section headings:
- Right-click associated Heading styles option in the Home tab.
- Select Modify... to open the Modify Styles pane.
- Change the font type, size, color, and spacing to your liking and select OK.
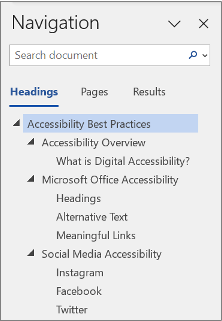
- The Navigation Pane allows you to quickly browse your document by headings and reorganize sections.

- You can easily create a Table of Contents from your heading structure:
- In the References tab, select the Table of Contents dropdown.
- Choose a style for your Table of Contents.