The swim lane map is a team technique for making ownership visible throughout a process. By placing each role or unit in its own horizontal lane and mapping the stages of work from left to right, teams can see who is responsible at each step and where handoffs or gaps in ownership occur. Clear ownership makes it easier for both employees and customers to know who is responsible at every stage.
Materials needed: Butcher block paper or a large wall surface, markers, sticky notes in two colors (one for lane activities, one for points of contact), sticky dots, tape.
Time needed: 90–120 minutes, depending on the complexity of the process.
Works well for: This technique works well for processes involving multiple people, offices, or handoffs where ownership or customer points of contact are unclear. It is most effective when completed by four to eight people who know how the process actually works.
Before you begin: Ask everyone in the group to come prepared with a general picture of the process you'll be examining – the major stages and the key roles, offices, or individuals involved at each stage. A rough mental map or a few notes is enough. The goal is to walk in ready to build.
Visual example:
Click to expand – will open in a new window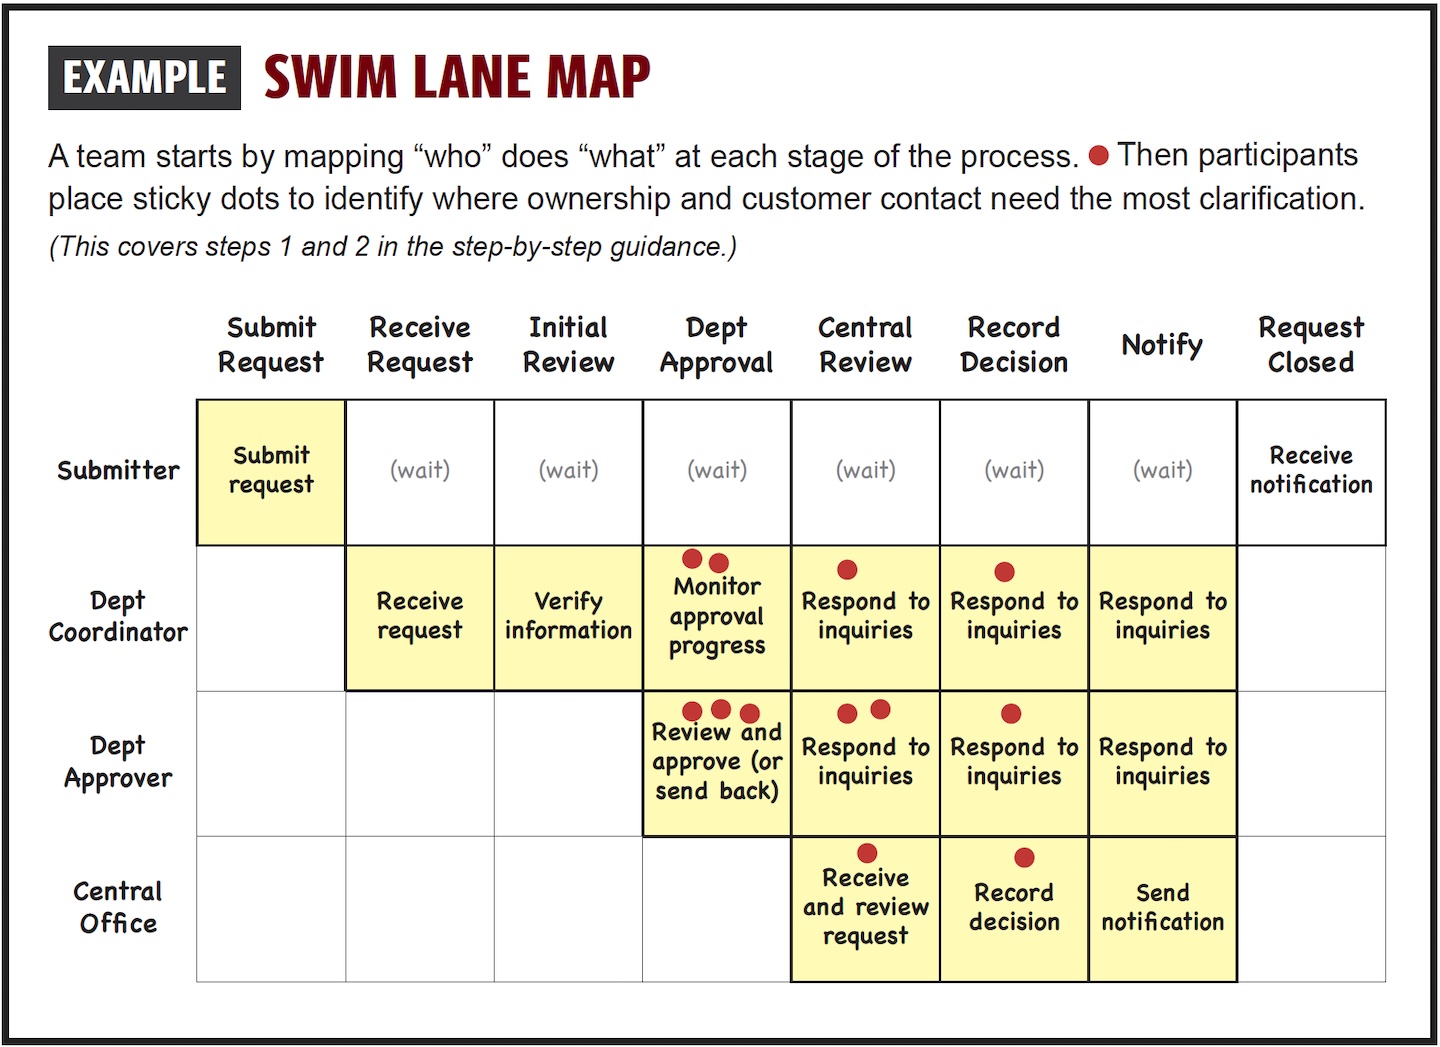
Step by step:
1. Set up your map: Roll out a large sheet of butcher block paper on a wall or table. Draw horizontal lanes running left to right – one lane per role, office, or unit involved in the process. Label each lane on the left side with the name of the role or unit. Write the major stages of the process across the top, left to right – no more than eight. Keep the number of lanes manageable; if the list grows beyond six or seven, consolidate where possible.
2. Fill in the lanes: Working stage by stage, groups fill in what each lane is doing at each point in the process using sticky notes. Ask the group: at this stage, what is this role or unit actually doing? Write it on a sticky note and place it in the appropriate cell. A cell with nothing in it is useful information – it means that role isn't involved at that stage, or shouldn't be. Don't fill in cells just to fill them.
As the map takes shape, watch for two things in particular:
- Stages where multiple lanes are active simultaneously with no clear owner – this often signals duplicated effort or contested responsibility.
- Stages where all lanes go quiet – this often signals a gap where something needs to happen but nobody has claimed it.
Capture observations like these on a separate area of the wall as they emerge – a "what we're noticing" space. These observations will be important in the next steps.
3. Step back and look at the whole picture: Once the map is built, ask the group to step back and look at it as a whole. Have participants place sticky dots on the areas of the map that stand out as most problematic – where ownership is unclear, where handoffs seem risky, or where the customer is most likely to be left in the dark. Then work through these questions together:
- Where does work pass from one lane to another? Are those handoffs clear
- Where does ownership disappear entirely?
- Where is the same work appearing in more than one lane?
- Where does the customer have no visibility into what's happening?
These are the moments worth naming before moving on.
4. Design the customer contact approach: This is one of the most important steps in the exercise. With the map on the wall, ask: if a customer needed help right now, what would be the best way for them to get it? Work through three questions at each stage:
- At what points would customers most likely have questions or need assistance? Not every stage requires a designated contact – focus on the moments that matter most.
- Who is the right contact at those points? Whenever possible, identify a role or office rather than an individual – roles remain stable even when personnel change.
- How does a customer actually reach them? A name without contact information isn't actionable. Capture the how directly on the sticky note – an email address, a phone number, a form, or wherever the customer should go.
Mark points of contact on the map using the second color of sticky note so they are visually distinct from the internal ownership picture. This step often surfaces stages where there is no clear answer – which is itself an important finding – and may prompt the group to reconsider whether multiple contacts make sense or whether a simpler approach would better serve customers. Capture the group's decisions before moving on.
5. Identify improvements and commit to next steps: Using everything the map has surfaced – ownership gaps, dropped handoffs, stages where the customer has no visibility or contact – identify the changes that would have the most impact. Capture these in an action plan with an owner and a realistic timeframe for each.
Before you leave the room: Make sure the following are captured: the ownership clarifications the group has agreed on, the customer contact approach the group has designed for key stages of the process, and the specific improvements the group is committing to with owners and timeframes. Take a photo of the completed map before it comes down – it's a useful reference as the group follows through on its commitments.