Meeting Purpose: 
Click below for practical tips and tools.
Identify at least one item that would be a meaningful change to your current way of thinking or doing when it comes to decision meetings.
Consider: Maybe you need to make the decision on your own or with one or two other people. Perhaps a meeting is not the best approach. If the decision at hand calls for urgency or specialized expertise, or if confidentiality is an issue, or if it's your responsibility to make the decision and move forward, skip the meeting.
Avoid inviting too many people. An alarm should go off if you're going beyond six or so people. Ideally, you want a select few who understand the context, options, and stakes – and have the expertise and a collaborative style to make a great decision.
Circulate key info afterward. After the meeting, list the decision(s), what needs to be done, who's responsible, and when it should happen – then share this with everyone involved.
Define the key decision-making criteria. These are the several significant factors that need to be top of mind when evaluating options. When people in a meeting are clear on the key criteria, discussions and decisions are much easier. (See "Tools and Techniques" below for guidance on putting criteria to work.)
Guard against groupthink. Encourage different perspectives, critical thinking, and open dialogue – even when it might go against the grain of your own thinking.
Aim for consensus. It can take extra time to build consensus, compared to calling a vote to make the decision, but it's a far better approach for getting shared agreement and ensuring genuine support.
The following agenda is a general example designed to serve as a starting point.
The percentages are approximate time allotments, to be adjusted based on specific needs or priorities for the meeting.
Sample Agenda
1. Introduction (5%)
- Clarify the purpose of the meeting, the decision we need to reach, and the importance of establishing decision-making criteria.
2. Criteria Development (20%)
- Work together to craft and define specific criteria for evaluating and comparing the available options. (These might be developed before the meeting.)
3. Options Review (40%)
- Review the different alternatives or choices.
- Discuss the options against the established criteria, identifying the advantages and potential drawbacks of each.
4. Consensus-Building (20%)
- Aim to achieve a consensus decision, again using the criteria as a guide. (Use a voting approach as a last resort.)
5. Next Steps (15%)
- Identify immediate actions to be taken moving forward, with assignments and timeline as appropriate.
When a group is discussing a decision, back-and-forth discussion is fine. But it often helps to make key points more tangible and visible – by writing them down or drawing them out. It can mean the difference between someone hearing an idea and someone understanding and adopting the idea.
If the meeting space has a whiteboard or flip chart, use it. Sticky notes are great too. If you're in an online meeting, turn on screen share and use something like Microsoft Whiteboard or draw.io. Or prep a visual before the meeting and have it ready to share.
Consensus is achieved when everyone can actively support the emerging decision, even if it might not be their top choice. Building consensus takes more time than a win-lose approach like voting, but it can save time in the end because it minimizes future conflicts, aligns efforts, and gets everyone working toward a common goal.
Video Series:![]()
1. What is consensus decision making? (1:53 min.)
2. How to do consensus decision making (2:48 min.)
3. Making consensus genuinely democratic (1:38 min.)
Step by step:
1. Clarify the options: In a meeting to make a decision, consensus building often begins with a number of options on the table. Start by clarifying these and making sure everyone understands.
2. Discuss: Have an open conversation in the group to ensure understanding, identify pros and cons of the various options, and so on. Having several key criteria that can be used to evaluate each option is a great way to keep everyone on track. (See decision matrix below for more about using criteria.)
3. See where people stand: Watch to see where the group is leaning in terms of a decision. Sometimes a consensus emerges quickly. Other times, there's a difference of opinion that calls for further discussion.
4. Talk further as needed and adjust: When disagreements come up, clearly identify what the group does agree on, then guide the group in talking through their differing points. Getting to consensus might call for tweaking the preferred decision a bit, or more significantly revising the decision – or finding another way forward that works for everyone.
5. Finalize agreement: Summarize the agreed-upon decision. Confirm that everyone understands and commits to supporting the chosen course of action. Then move on – don't reopen and re-process the conversation.
A simple decision balance sheet helps a group think through the pros and cons of various decision-making options.
Step by step:
1. Define the decision: Clarify the decision that needs to be made, and identify the available options.
2. Create the balance sheet: Draw a table or use a flip chart to create a two-column balance sheet. Label one column "pros" (positives) and the other "cons" (negatives).
3. Build the two lists: Brainstorm and list all the potential pros and cons associated with each option. Consider factors such as benefits, advantages, drawbacks, risks, and disadvantages.
4. Discuss and clarify: Go through all the points. Discuss as needed to ensure a shared understanding.
5. Evaluate the impact: Discuss the potential impact of each pro and con on the overall decision. Consider short-term and long-term consequences. (Optional: If certain pros or cons carry more significance, consider giving numerical weights to all the brainstormed items to reflect their relative importance. A scale of 1 to 5 usually works well.)
6. Review all the findings: Compare the overall balance between positive and negative factors. Encourage group members to discuss their perspectives and reach a consensus.
7. Put the findings to work: Use the insights to inform the group's decision-making process. Very often, a thorough look at pros and cons will effectively reveal the most favorable way forward.
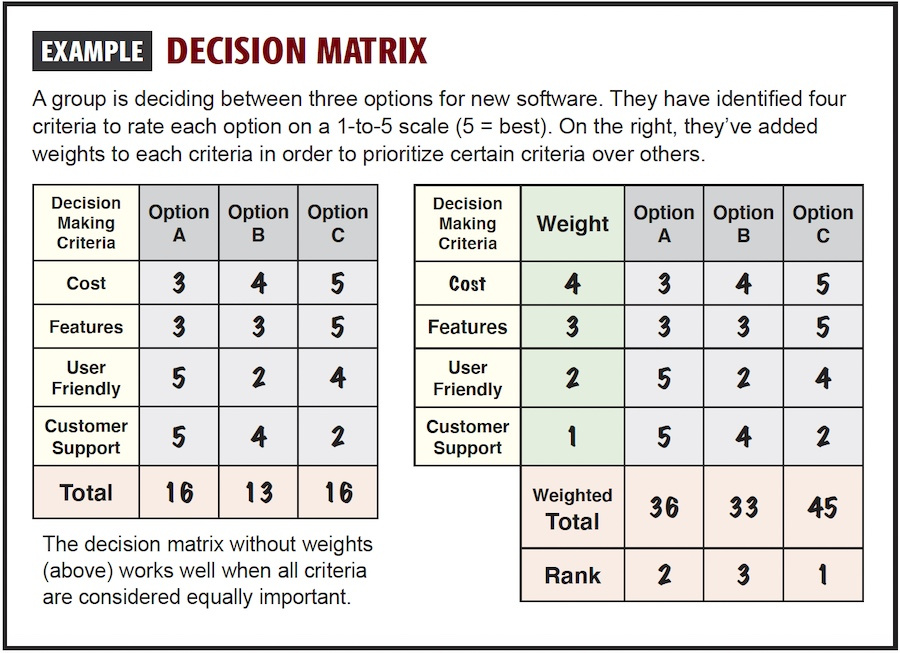
A decision matrix allows you to evaluate choices against set criteria. By assigning scores to each option, it makes it easier to see which choice aligns best with what you're looking for.
Video: Decision Matrix![]() (4:58 min.)
(4:58 min.)
Visual example:
Click to expand – will open in a new window
Step by step:
1. List criteria: Start by listing the criteria or factors you want to evaluate. These could be features, qualities, or attributes that are important for making a decision or comparison. Here is a sample of possible criteria:
▪ Service to customers
▪ Effectiveness
▪ Importance to the organization
▪ Link to unit/area goal(s)
▪ Time to implementation
▪ Ease of implementation
▪ Cost
2. Set rating scale: Decide on a rating scale to assess each criterion. This could be a numerical scale (e.g., 1 to 5) or descriptive scale (e.g., poor to excellent) based on your needs.
3. Evaluate options: For each criterion listed, rate or score each option, item, or alternative based on how well it meets or satisfies that specific criterion. Use the predetermined rating scale to assign a score or rating.
4. Calculate scores: Once you've rated each option for all criteria, calculate the total scores or average ratings for each option by summing up the individual scores or averaging the ratings assigned to each criterion.
5. Compare and analyze: Review the scores or ratings for each option to compare and analyze their performance or suitability based on the established criteria. Identify strengths, weaknesses, and differences among the options to inform decision-making or selection.
6. Make an informed decision: Use the criteria rating form to facilitate discussion, prioritize options, or make an informed decision by considering the ratings, scores, and evaluations of each option in relation to the defined criteria.
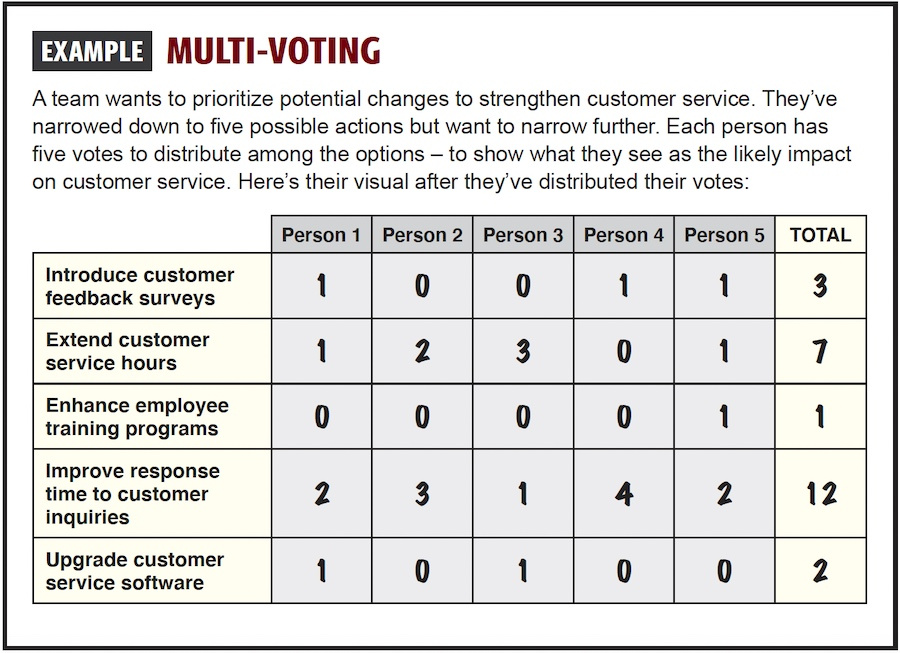
The multi-voting technique is a simple way for groups to decide on the most important options or ideas when there are many choices.
Video: How to use multi-voting ![]() (2:18 min.)
(2:18 min.)
Visual example:
Click to expand – will open in a new window
Step by step:
1. List the options: Start by making a list of all the options, ideas, or choices that the group will consider. Write them down so everyone can see.
2. Set up the voting: Give each person in the group a set number of votes to distribute among the options. For example, if there are 10 options and each person gets five votes, they can distribute those votes however they want among the 10 options.
3. Place votes: Ask each person to place their votes next to the options they think are most important or best. They can put all their votes on one option or spread them out among several options, depending on what they think is best.
4. Identify the emerging top choices: Once everyone has placed their votes, add them up to see which options are the most favored or important according to the group.
5. Discuss and decide: Discuss the top options, why they received the most votes, and how they align with the group's goals. Use the insights to move closer to – and perhaps even make – the decision.
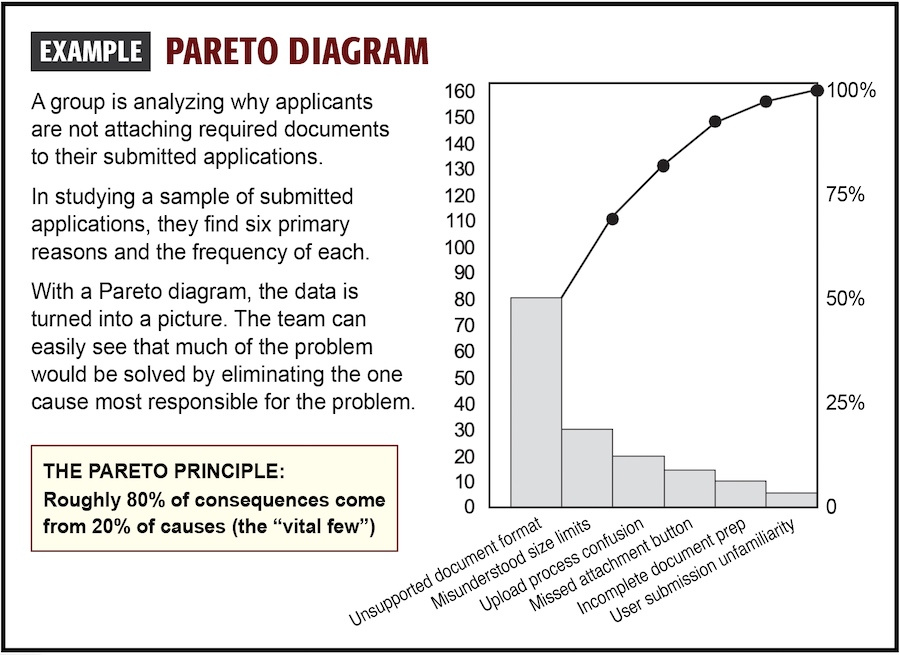
A Pareto diagram is a vertical bar graph that breaks a problem into its parts and shows where improvement efforts should be focused. Its visual format makes it easier to evaluate and prioritize actions – which is why it can help groups with decision-making. Once the graph is created, the tallest bar reveals what is most contributing to the problem. The name of the chart comes from the Pareto Principle, which states that roughly 80% of the effects come from 20% of the causes.
Video: ![]() Whiteboard demo of Pareto analysis (7 min.)
Whiteboard demo of Pareto analysis (7 min.)
Visual example:
Click to expand – will open in a new window
Note: A Pareto diagram is created in advance, typically with input from the group. The finished diagram is then shared and discussed at a meeting.
Step by step to create a Pareto diagram:
1. List the issues: Write down all the problems or issues you want to analyze, such as defects, errors, complaints, or costs.
2. Collect data: Gather data on each issue, such as the number of occurrences, frequency, or impact.
3. Rank the issues: Arrange the issues in descending order based on their frequency or impact, starting with the most significant problem at the top.
4. Calculate cumulative percentage: Calculate the cumulative percentage by adding up the percentages of each issue as you go down the list.
5. Plot the chart: Construct a Pareto chart or graph by plotting the ranked issues along the horizontal axis (x-axis) and their respective frequencies, costs, or impacts along the vertical axis (y-axis). Also, include a line graph illustrating the cumulative percentages to visualize the cumulative impact or contribution of each issue.
6. In the meeting, review the graph and identify the vital few: Compare the frequency or other measure of each category relative to all the others. Identify the "vital few" issues that contribute to approximately 80% of the total problems or impacts, focusing on addressing these priority areas first.
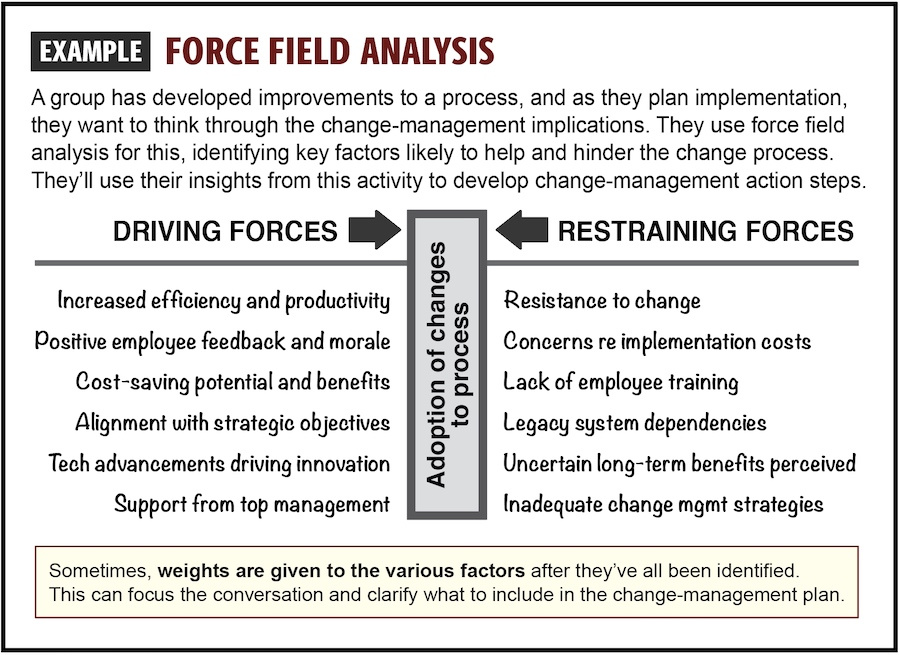
Force Field Analysis guides groups in identifying two key factors that can make or break the implementation of a decision: "driving" forces that are likely to be supportive of implementation, and "restraining" forces likely to hinder implementation. This tool doesn't help make the decision, but rather, it starts with the decision and gets the group thinking about forces and factors that will greatly affect implementation.
Video: Whiteboard demo of force field analysis![]() (3:29 min.)
(3:29 min.)
Visual example:
Click to expand – will open in a new window
Step by step:
1.Identify the decision: Clearly articulate the decision you are considering. Make sure it's well-defined.
2. List the driving forces: Identify and list all the factors that are pushing toward the decision or change. These are the driving forces that are likely to support the implementation of the decision.
3. List the restraining forces: Similarly, identify and list the factors or forces that are holding back or opposing the decision or change. These are the negative aspects, obstacles, or challenges that might prevent or slow down the implementation of the decision.
4. Assign weights: Assign a numerical value or weight to each "force" based on its likely strength or impact. This can be a subjective assessment, using a scale like 1 to 5, where 1 is weak and 5 is strong.
5. Evaluate the balance: Calculate the total scores for both driving and restraining forces. Compare the totals to evaluate the balance between the forces pushing for the change and those resisting it. A higher score for driving forces indicates a greater likelihood of success, while a higher score for restraining forces suggests challenges and resistance.
6. Develop strategies: Based on the findings, brainstorm strategies or actions to strengthen the driving forces and weaken or overcome the restraining forces. Consider ways to leverage positive factors and address or mitigate challenges to facilitate the decision effectively.
7. If needed, refine the decision: Although force field analysis starts with the decision, the exercise of analyzing "driving" and "restraining" force might uncover a need to refine aspects of the decision. Circling back and revisiting the decision shouldn't be done lightly; you don't want to duplicate effort and waste time. But if there are newfound insights that tell the group to fine-tune its decision, definitely do so.
8. Implement and monitor: Put the decision into action and closely monitor the situation. Be prepared to adjust strategies if needed based on ongoing feedback and results.